

The Battle of Neville’s Cross
In my humble opinion the Battle of Neville’s Cross was one of the most important of the Hundred Years War yet is hardly ever mentioned. It ended with the capture and long-term incarceration of a king and helped bring peace to a region that had been harried by the Scots for decades. Given that it’s right on my doorstep here in Durham, I’d like to help bring it to prominence with this article. I’ve relied for information on various publications and papers from authors like David Penman, Michael Prestwich, Alexander Grant, Richard Lomas, and Robert Hardy all of whom—with the exception of David Penman—contributed to an excellent handbook titled The Battle of Neville’s Cross 1346 (ISBN 1-900-289-20-2) published by Shaun Tyas for a symposium in 1996 marking the battle’s 650th anniversary.
I’ve also read many of the chronicles that document the battle as well as contemporary speculative works such Lt. Colonel Burne’s “concept of inherent military probability” plus most of the popular myths, legends and folklore. As an enthusiast of military history of all periods, battle sites feature frequently on my travels, on foot and by bike (as well as by car). I’ve spent many hours exploring Neville’s Cross—only a couple of miles from my home—comparing it with others from the period including Hallidon Hill, Crecy, Poitiers, Otterburn and even Towton. Rather like Colonel Burne, I’ve come up with my own unique set of highly speculative conclusions to questions I feel need to be answered. All materials used in this post however are copyright of The Durham Cow.
It’s a generally held frustration that battle sites, up to and including the medieval period, tend to offer little in the way of physical evidence for the bloody events that unfolded upon them. Unlike the participants, the battle site is invariably unmolested; the dead are removed (although mass graves—as at Towton—have proved invaluable) and the field scoured for anything of value—particularly metal. This means that it’s necessary to rely on written accounts, or chronicles, few of which are contemporaneous and—just like today—have usually been written to glorify, or vilify, one side or the other.
Probably the most trustworthy and contemporaneous source we have for the “Battle of the Red Hills” (or “Neville’s Cross” as we know it now) is John Fossor’s letter to Thomas Hatfield. Fossor was the Prior of the monastery at Durham at the time of the battle while Hatfield was his bishop, then on campaign in France with Edward III.
If you’d like to experience the nature and extent of the site (including the historic part of Durham City) for yourself, check out our Battle of Neville’s Cross Tour.
Prelude
On being woken that chilly Tuesday morning in October, 1346, the young Scottish king, David Bruce, is said to have dismissed the impending arrival of a large and unanticipated English army. En-route to Ogle Castle a few hours later, as a prisoner of the English squire, John de Coupland, he’d have had time to reflect on his rash appraisal of the situation if the arrowhead supposedly lodged in his face wasn’t sufficiently distracting.
Ten days before the armies clashed on Crossgate Moor, David had led a large force across the Anglo-Scottish border confident that the best part of the English army was in France besieging the port of Calais. The son of Robert the Bruce, who had famously rid his country of English domination and laid waste to its northern marches for years, he was also the brother-in-law of the English king, Edward III — who he was in the process of attacking. The invasion had been planned to help the French king, Philip VI — who had given David refuge when he was exiled from Scotland — lift the siege on Calais by attacking England from the north.
“There are none in England, but wretched monks, disreputable priests, swineherds, cobblers and skinners.”
David Bruce, King of Scotland (1329-71)
Although fraught with risk, it offered an opportunity to build on his father’s legacy and establish his own reputation. Since returning to Scotland from France he had mounted several raids into England. Nobles like John Randolph, who had served together with Robert Stewart (David’s older nephew) as the Scottish regent during David’s absence, and William Douglas were all successful, aggressive and experienced commanders who must have inspired confidence in the enterprise being successful.
While his father’s strategy of guerrilla-style ‘hit-and-run’ warfare had proved successful in the years when England lacked an effective king, David’s campaign was more ambitious, well-invested but ponderous. He intended to plunder the resources of English towns like Hexham, Corbridge, Durham and Darlington, possibly using them as winter quarters, thus giving the impression that he intended a protracted stay.
The Scottish Muster
The English appear to have been aware that the Scots were recruiting as early as 20th August 1346 (before the battle of Crecy on the 26th). The initial muster was in Perth – probably towards the end of September. Here the the highland chieftain, Ranald MacRuari of Garmoran, was murdered in Elcho nunnery by his old rival, the Earl of Ross who subsequently departed with haste along with his entire retinue, a slight that would have been inconceivable against David’s father.
Invasion
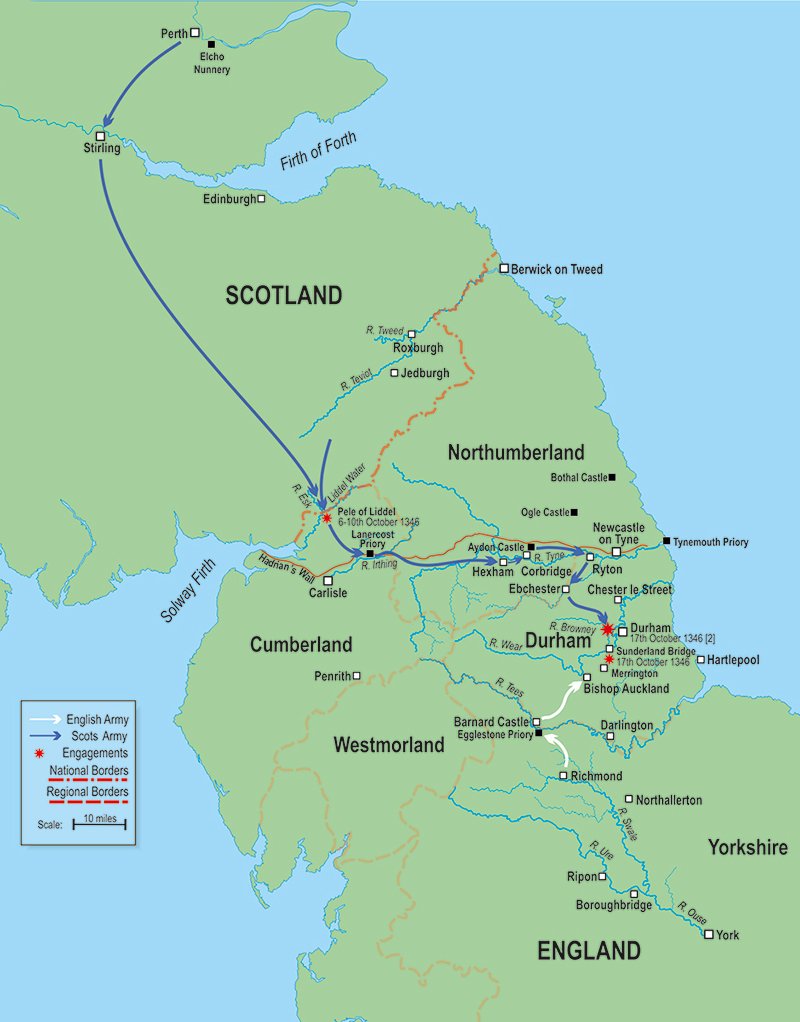
While continuing to gather support on the journey south, the Scottish host crossed the border on the 7th October, laying siege to the ‘Pele of Liddel’, the ruins of which today are known as ‘Liddel Strength’ (they can be visited near the confluence of the River Esk and Liddel Water on the Anglo-Scottish border about 10 miles north of Carlisle). A force under William Douglas, the ‘Knight of Liddesdale’, reached the tower that morning, being joined by the rest of the Scottish army in the evening. When the Scots finally took the tower – after four or five days – they killed every adult male including the keeper, Walter de Selby, and his two sons. At this point Douglas is believed to have advised David that it might be wise to turn back.
Nevertheless, David decided to continue and led the army south-east towards the Augustinian priory at Lanercost sparing the countryside around Carlisle which had bought off the Scots for 300 marks. The priory however, was ransacked, after which the Scots continued along the River Irthing and on, down the Tyne Valley, to Hexham where they quartered for three days. Hexham Abbey received the same treatment as Lanercost though, on the orders of David himself, the town was left generally intact.
“Tents of the richest and noblest sort, the likes of which had not been seen in these parts for a long time”
John Fossor, Prior of Durham Monastery (1341-74)
In a bid to save its inhabitants, the Aydon Castle, overlooking the Tyne Valley near Corbridge, was voluntarily surrendered. The Scots then followed the River Tyne east beyond Ryton, possibly crossing the river via the ford at Newburn. The River Derwent presented the next natural barrier which was crossed at Ebchester. Here, the long-abandoned Roman fort of Vindomora had defended the important supply route of Dere Street and it’s quite possible that they followed this out of the steep valley, heading for Durham about 14 miles away. They’re thought to have arrived on the ‘moor of Bearpark’ around mid-afternoon. Drawing up in full force to announce their intention they turned into the park, descending on the Prior’s hunting lodge at Beaurepaire where they set up camp.
The English Response
The threat from the Scots had however, been anticipated by the English. Some of the most prominent English commanders who fought at the battle, including Henry Percy, Ralph Neville, Thomas Rokeby and the Archbishop of York had been charged with overseeing arrangements for a response. Officials had been shuttling between London and northern England since the beginning of the year with Henry Percy receiving instructions from the king to send spies into Scotland. Recruitment was already underway, primarily from areas north of the Trent although there had been difficulty obtaining co-operation from Nottinghamshire and Derbyshire. Desertions, as ever, were causing problems and many civic bodies were reluctant to make obligatory financial contributions.
It’s possible that the English were surprised that their victory over the French at Crecy had failed to act as sufficient warning to the Scots. Nevertheless, the response was swift: the Archbishop of York, William de la Zouche, went to Richmond and over the course of several days assembled a large body of troops which he marched to the impoverished Premonstratensian abbey at Egglestone just outside Barnard Castle. Here they mustered somewhere around the 14th-15th October along with the retinues of other English magnates during which time the hardships imposed on the ‘White Canons’ of Egglestone were almost intolerable. Next morning, the 16th October, they crossed the River Tees and marched north to Bishop Auckland, through the manor of Ralph Neville himself and from where, no doubt, they continued to gather strength. On arriving in what is now Bishop Auckland, about ten miles south-west of Durham, they concealed themselves on a wooded hill in the Bishop of Durham’s hunting park.
Preliminaries
Events on the morning of the 17th would have begun early for both sides: at the same time that the English army was confessing itself at Bishop Auckland, a large Scottish force of over 500 men led by William Douglas, was probing southwards on what may have been some sort of foraging operation. Shortly after crossing the River Wear in the vicinity of present day Sunderland Bridge, they ran into the English vanguard in an area known today as ‘Butcher’s Race’.
Stunned at the unexpected appearance of such a large English force, the Scots appear to have turned tail, heading swiftly back the way they had come with the English in hot pursuit. A ‘great number’ were killed while crossing the river at Sunderland Bridge. Those that managed to cross – including Douglas – were pursued for some distance back towards the Scottish camp at Beaurepaire. David’s response to being woken with such news is said to have been as documented above but, nevertheless, the army was readied and was moved out of the park towards Durham.
Exactly how the battle unfolded is a matter of conjecture and will probably always remain so. According to Prior Fossor, the armies arrayed themselves on the moor of Bearpark where the topography still shows the restricted scope for manoeuvre. Crossgate Moor, where the English army is believed to have established itself, is a narrow ridge running north-south, with steep slopes to the east and west and no more than 600 metres wide (roughly where Durham Johnston School is today). A steep slope descends into Flass Vale to the east while to the west, the ground slopes more gently downwards towards sandstone quarries along the east bank of the River Browney. The whole area is only about 1.5 square kilometres.

Following military convention of the times, both sides are believed to have arranged themselves into three divisions in a space so confined and beset with natural obstacles that it is not obvious how they might have done it. My own belief is that the Scots could only have attacked with cohesion southwards, up the spur from Club Lane, as it seems that hedges which are likely to have been in place at the time would have hindered an attack from the north-west. The English deployed a large complement of archers but exactly where and how is uncertain. We know that the tactic was to dig pits to hamper cavalry but what did they dig them with? Some form of mattock perhaps? Overall numbers for each side vary widely – spectacularly if the the chroniclers are to be believed – but more reasoned estimates put them at around 10,000 for the Scots and 6,000 for the English.
Chroniclers seem to agree that the first Scottish division was led by King David, the second by John Randolph, Earl of Moray and Sir William Douglas with the third under joint command of the king’s nephew, Robert Stewart, Earl of Atholl and High Steward of Scotland and Patrick Dunbar, Earl of March. Things are less clear on the English side however: in one popular permutation, the first division is led by the Archbishop of York with Thomas Percy and Ralph Neville leading the second, and the third, sometimes referred to as ‘the rearguard’ being led by Thomas Rokeby, the Sheriff of Yorkshire.
“both sides fought strenuously, bitterly and very fiercely using swords, lances, bows and axes…”
John Fossor, Prior of Durham Monastery (1341-74)
After receiving blessings and encouragement from the Archbishop of York, it might be reasonable to believe that the English could have initiated the battle by having their archers harass the Scots who, not being able to draw on sufficient trained archers, had no substantial means of reply. In response, John Graham, the Earl of Menteith, offered to take 100 mounted knights forward to engage the English. It’s claimed he was denied permission and so attacked by himself, causing consternation in the English ranks but eventually having his horse killed under him and only just managing to evade capture.
The Scots appear to have been disadvantaged from the outset: the king’s division was fighting in“a right annoyous place” with Moray and Douglas’ advance being hindered by ‘high dykes’. Nevertheless, to the sound of trumpets and the roar of thousands of brave, and no doubt frightened men, the divisions managed to engage so effectively that on at least two occasions, the English archers and ordinary soldiers were forced to retreat behind the more heavily equipped men-at-arms who stood firm until defence could be reorganised. It was an untypically long encounter, said to have lasted from ‘nones until vespers’ (2 pm until around 5 pm) with fighting so fierce that brief truces were held to allow combatants to recover. Such was the carnage that the engagement was originally known as the ‘Battle of the Red Hills’ and where today there’s an area of Durham known as ‘Red Hills’.
Defeat From The Jaws Of Victory
With the English managing to do little more than hold their ground, Stewart and the Earl of March, for reasons known only to history, declined to commit the large reserve for which they were responsible. It may have had something to do with Thomas de Lucy’s arrival on the field with a large contingent from Yorkshire of what is said to have been up to 3000 mounted archers, though it could have been that they only took part in the pursuit. Perhaps there were political reasons for leaving the king to his fate but it appears to have been an unrecoverable tactical error which undermined what was left of the army. Without the reserve, the remaining Scots were overwhelmed and routed.
While apparently fighting valiantly, the king had suffered a couple of well-documented arrow wounds, one of which was to the face, and was captured – at considerable profit – by the English squire, John de Coupland or Copeland. Maybe it was under the bridge at Aldin Grange, as legend would have it, though it seems unlikely as it’s a long distance for such a high status combatant to cover, never mind the inconvenience of being badly wounded. Unless perhaps, the battle took place elsewhere? Meanwhile, the mass of retreating Scots were fleeing north towards ‘the hill of Fyndoune’ (Findon Hill, near present-day Sacriston) where the final actions took place. Survivors would face a long and perilous journey to reach their homeland – over a hundred miles away – with some riding horses belonging to their dead or captured leaders.
“Many valiant men of Scotland were slain and lay strewn about over the moor of Bearpark, miserably exposed…“
John Fossor, Prior of Durham Monastery (1341-74)
The day proved to be an overwhelming victory for the English whose casualties were described by Prior Fossor as ‘few’ while amongst the many Scots killed was John Randolph, perhaps, the most able of David’s commanders and whose father had been a trusted lieutenant of Robert the Bruce. His death brought an end to the male line of his family. Also killed was the Earl of Strathearn and Niall Bruce, David’s illegitimate brother, together with many other Scottish magnates and officials including the Marischal, Chancellor, Chamberlain and Constable of Scotland.
As was usual for the times, nobles who were taken prisoner could usually expect a reasonably comfortable confinement during the time they were held for ransom, in fact they would often hand themselves over. The common soldier however, could expect a far less merciful fate as there was no capacity for taking prisoners. Of the nobles taken prisoner on the day were: the Scottish king himself; William Douglas, Knight of Liddesdale; the Earl of Sutherland; the Earl of Wigtown (who escaped from Bothal Castle near Morpeth); John Graham, Earl of Menteith (taken to London where he was executed as a traitor) and Duncan, Earl of Fife (whose kinship to Edward III may have saved him from a similar fate).
Aftermath
In terms of its lasting effects, Neville’s Cross must be seen as one of the most decisive of the Hundred Years War and the only one to be fought on English soil. It finally secured England’s northern border and according to Prior Fossor brought to an end “…the pitiful discord which prevailed between English and Scots over the course of many years”. In fact, Durham would be free of further Scottish military incursions until the Wars of the Three Kingdoms (English Civil War) almost 300 years later.
For years to come, the Scots would be preoccupied with the political problems of establishing a new regency government. The 13th-century showed that where the king was weak the fortunes of that country’s border regions suffered accordingly. David’s release was finally negotiated in 1357 after 11 years in English captivity during which time he seems to have become something of an anglophile. The ransom payments of 100,000 marks over 10 years were unsustainable and were the source of constant trouble until the English were distracted by renewed hostilities with France in 1369. When he died in 1371, David left no heir so was succeeded by his nephew Robert Stewart who, for whatever reason, had deserted him at Neville’s Cross and who would become the first of the Stewart (Stuart) dynasty destined to unite the two nations.
March 12, 2021 @ 3:59 pm
Thanks Scott, Keep up the good work!
March 12, 2021 @ 6:28 pm
No problem Archibald – happy to help.
Scott
February 28, 2021 @ 10:19 am
Scott
I am seeking information on John Sandilands, one of the Scottish prisoners who may well be an ancient ancestor of mine [A Sir John Sandilands, evidentially active at the time certainly is my 18th Great Grandfather].
Please can you advise me of the historical source of your list of Scottish casualties/prisoners etc. I recognise many of the prisoners names from other sources, but have not come across John Sandilands before.
Cheers
March 8, 2021 @ 9:15 am
Hi Archibald,
I haven’t found much on James Sandilands: Michael Penman in ‘The Scots at the Battle of Neville’s Cross’ (p.163) mentions James Sandilands of Walston being favoured by David II in years prior to the battle; Mark Arvanigian & Antony Leopold ‘Illustrative Documents: The Battle of Neville’s Cross’ include The Chronicle of Geoffrey le Baker (Chronicon Galfredi le Baker de Swynebroke) who specifically mentions James Sandilands as being captured after the battle. That’s all I’ve got I’m afraid.
March 8, 2021 @ 9:58 am
Scott
Thank you, this is useful. Your article lists the names of the prisoners, including John Sandilands, did those names [outside the “famous” ones] come from the sources above?
Archibald
March 12, 2021 @ 3:38 pm
Yes, they did.
Scott
August 22, 2019 @ 7:28 pm
What happend to all the dead
August 25, 2019 @ 3:49 pm
Hi James,
It’s a good question and one that seems to be problematic for conflicts where there are no detailed records. As far as I know there is no reliable evidence to suggest what became of battle casualties. Their numbers, like those of combatants generally, are invariably unreliable and usually appear to be heavily exaggerated by chroniclers with various agendas. Whilst wealthy combatants might be well treated and ransomed, common soldiery might well have been finished off if wounded or possibly even killed when captured. Grave pits discovered at Towton suggest that the dead were stripped of anything of value and buried together.
Best Regards
Scott